Reference docs
Getting Started
Building & deploying
Overview
In addition to provisioning and managing your app's infrastructure, Begin is also a fully integrated CI/CD build pipeline optimized for incredibly rapid deployments.
Begin builds spin up instantly and run in parallel, so you can build and deploy as quickly as you can push changes to your default GitHub branch (usually main).
Deployments to staging and production take only seconds and are instantly available at scale – enjoy the benefits of near-instant iteration with frequent pushes!
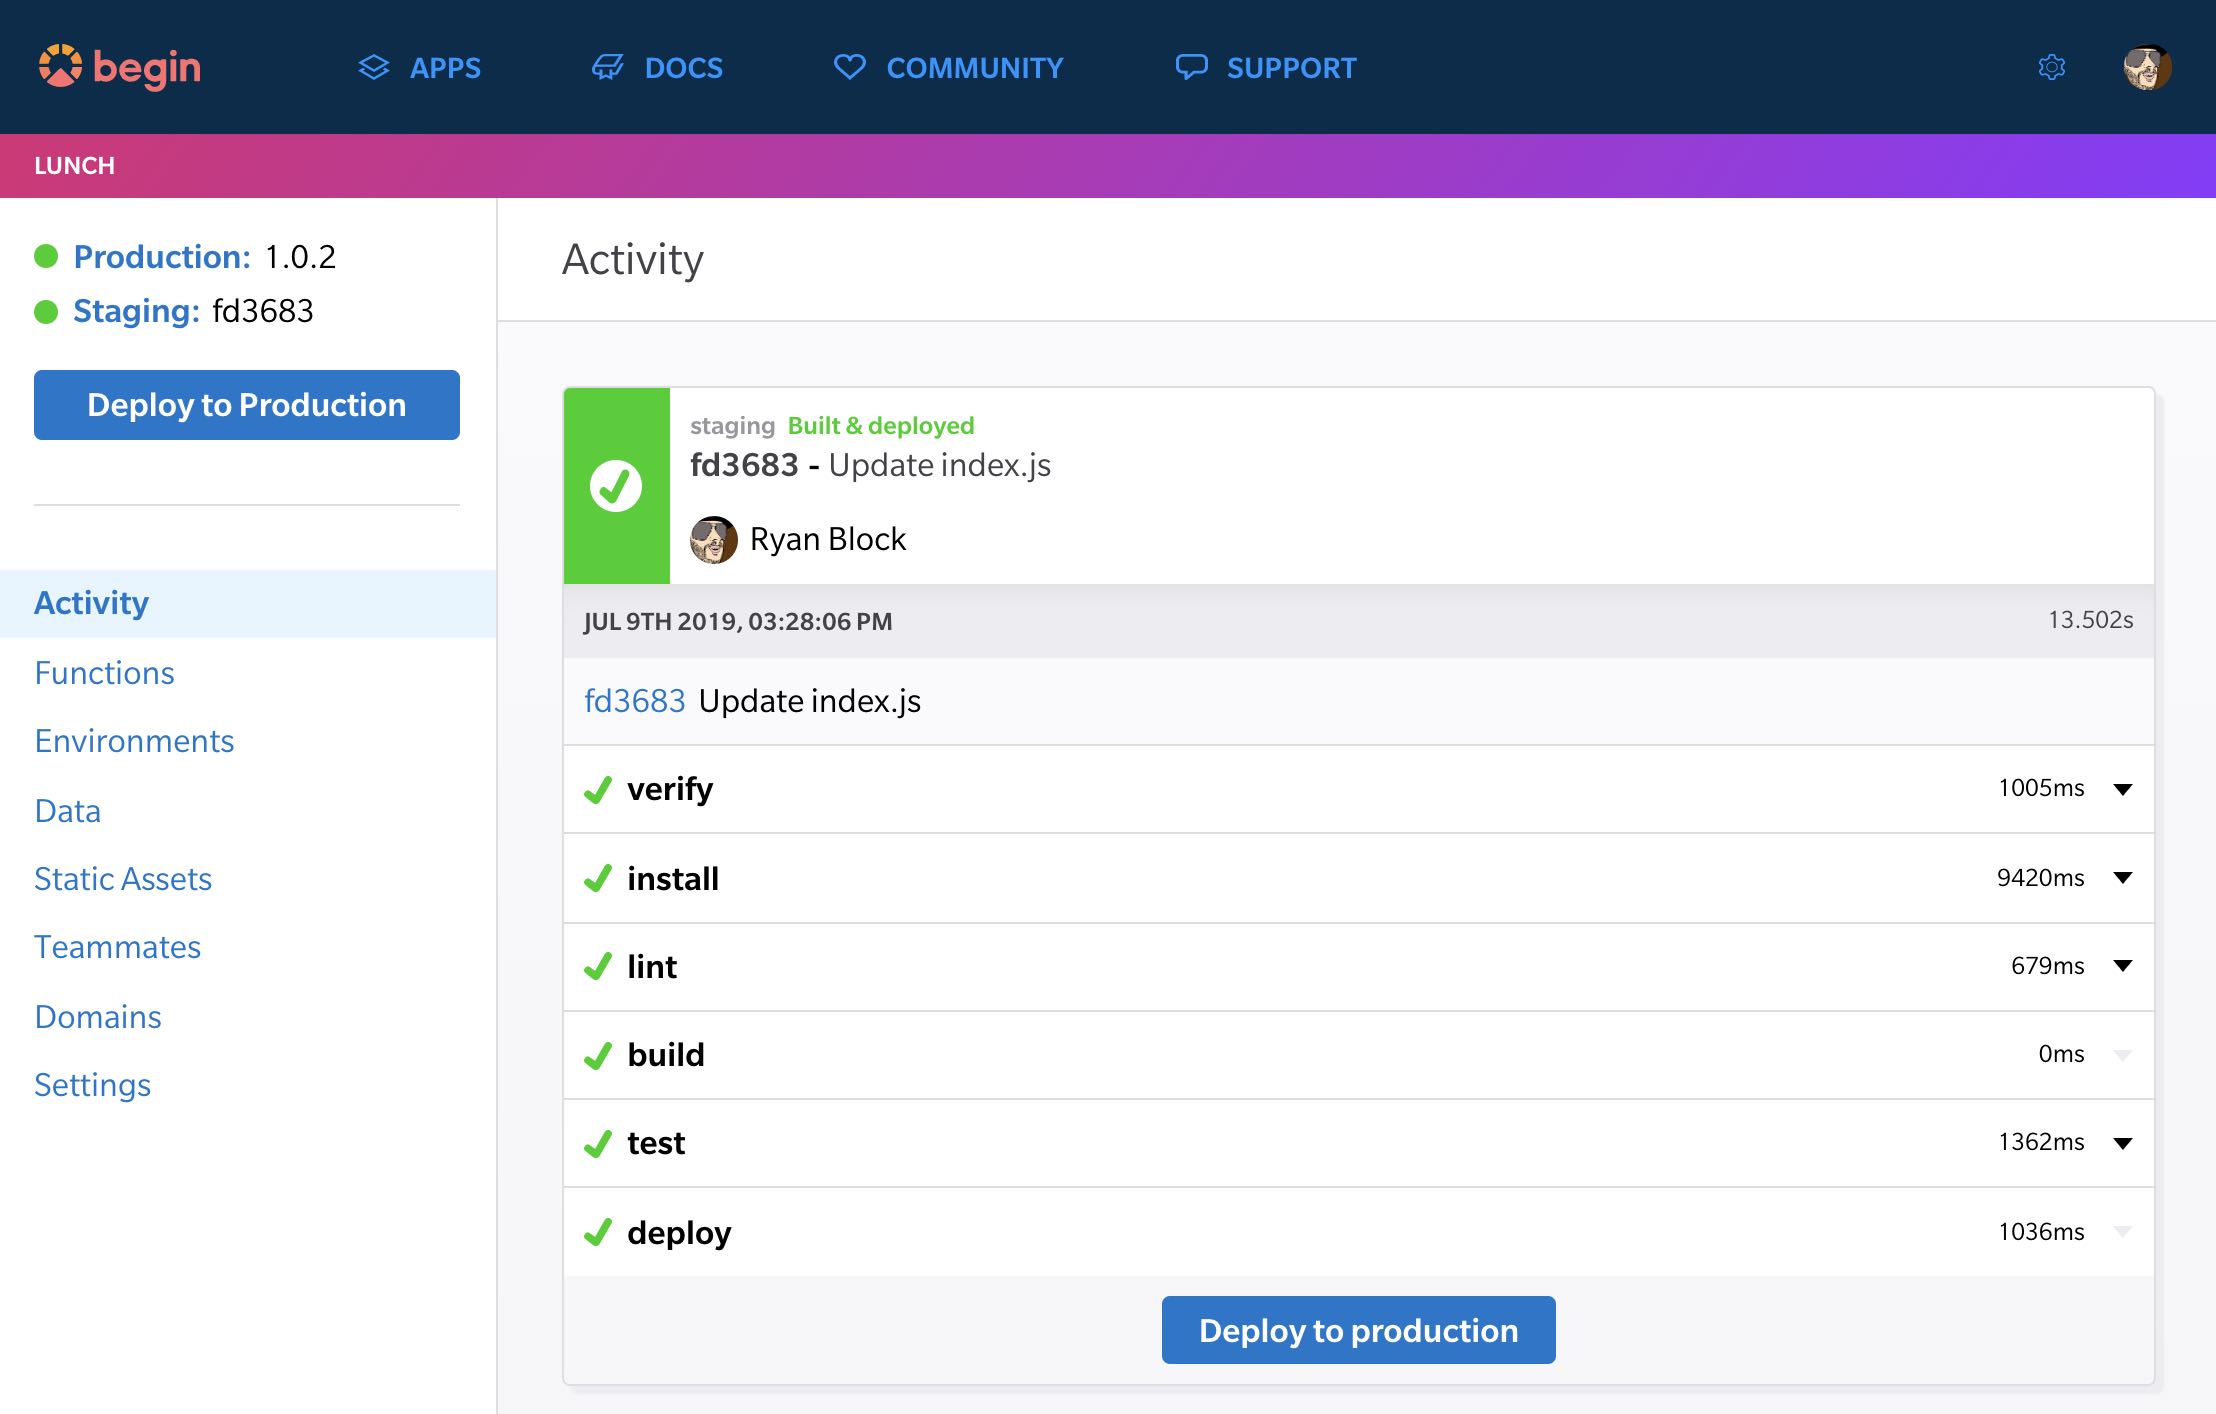
The Activity view – your default view in Begin - shows all your app's builds, its current deploy status, and corresponding build log data.
Build pipeline
Begin offers three hosted environments out of the box: testing, staging, and production. Begin also supports full local development, of course.
Within these hosted environments, Begin follows a fairly traditional CI/CD build pipeline:
testing- Commits to the default branch kick off CI; green builds deploy tostagingstaging- Runs latest green build from your default branch; clicking theDeploy to Productionbutton in the left nav in Begin (or cutting a git tag) deploys toproductionproduction- Runs the latestproductionrelease
Deploying to staging
Each push to your default branch kicks off Begin CI.
The last step for each green build is a staging deploy.
The version of your app currently running on staging is represented by the commit SHA, and can be found in the upper left corner of Begin.
Deploying to production
Deploys to production can only occur when the latest staging build is green (i.e. all build steps passed without error).
Assuming your current build is green, cut a production release by:
- Using the
Deploy to Productionbutton in the left nav in Begin, or - Creating a git tag, i.e.:
git tag -a 1.0.1 -m "This release includes 20% more cowbell" git push origin 1.0.1 - Or also by creating a Release in GitHub
The current running version on production is represented by the version you specified in your git tag (and is also found in the upper left corner of Begin).
👓 Note: We strongly encourage the use of SemVer when creating
productionreleases!
Configuring build steps
Begin CI executes three default, non-configurable steps: (verify, install, and deploy); and three optional, configurable steps: build, lint, and test. In order of execution:
Verify
Responsible for validating the repo payload from git and prepping Begin's infrastructure for a deployment.
This step is non-configurable and does not output logs.
Install
Responsible for installing dependencies to:
- The project root (
./) - Your project's cloud function directories (i.e.
src/http/**) - Your project's shared code, if any (i.e.
src/shared/,src/views/)
This step is non-configurable and does output logs.
Note: dependencies in your project's root
package.jsonare not available to your individual Functions; you should treat deps in the root as developer dependencies only.To ensure a dependency is available to a given Function,
cdinto that function's folder and install it there.To install global deps, install them to
src/shared– but mind dependency bloat! Function dirs must weigh in under 5MB uncompressed.
Build
Optional
Runs an arbitrary build script defined in your project's root package.json like so:
{
  "scripts": {
    "build": "./scripts/build"
  }
}
This is a great place to generate static assets (to be deployed via the public/ folder) or implement a bundler such as Webpack or Parcel.
Lint
Optional, but highly recommended!
Runs eslint by default (or the linter of your choice). Defined in your Begin app's default package.json (and for hopefully obvious reasons we strongly suggest not removing it):
{
  "scripts": {
    "lint": "eslint src --ignore-pattern node_modules --fix",
  }
}
Test
Optional, but highly recommended!
Defines your test procedures. Like lint, it's defined in your Begin app's default package.json (and we strongly recommend expanding your app's tests):
{
  "scripts": {
    "test": "NODE_ENV=testing tape test/*-test.js | tap-spec"
  }
}
Head here to learn more about writing tests.
Deploy
Ah, the step we've been waiting for!
Provided all other build steps exit(0), Begin takes over again to manage deployment, which primarily includes:
- Deploying all Function folders to their corresponding cloud functions
- Deploying static assets (
public/*) to your app's built-in blob store (S3) and CDN
The deploy step is non-configurable and does not currently output logs.
Changing your default branch
Git (and GitHub) formerly defaulted new repos to using a branch named master, a term actively being phased out by our industry. If you created your repository before this change, fear not; the procedure for changing your default branch is pretty straightforward (although it may surface some edges as you check for other downstream dependencies). Altering source control should be done with care and due diligence.
👓 Note: If you're associating a fresh Begin app with an existing GitHub repo, no configuration is required – Begin will use whatever you've already set the default branch to be, and will ship builds from pushes to that branch automatically.
These instructions will assume you'll be renaming your default branch to main, but you can name it whatever you like.
- First, check to ensure any apps or services you have connected to your repo don’t depend on
master; if so, prepare to reconfigure them to usemain - Make sure to let any collaborators on your repo know that you’ll be changing
mastertomain, as they’ll have to make some (simple) local changes once it’s done - Optional, but it’s smart to clean up any outstanding pull requests to
master; merge them if possible (or at least be prepared to set them to your new destination branch) - Always good hygiene: have a good backup of your repo and any work that’s not checked in, just in case
Now let's rename your existing default branch to main:
git branch -m master mainFrom the git docs With a -m or -M option,
will be renamed to . If had a corresponding reflog, it is renamed to match, and a reflogentry is created to remember the branch renaming. Ifexists, -M must be used to force the rename to happen.
Then, push this newly renamed branch to GitHub:
git push -u origin mainFinally, change the default branch in GitHub with the following steps:
- Go to your repo on GitHub's web console
- Go to Settings > Branches
- Change the default branch from
mastertomain(it should appear in the drop down list as a result from the earlier push) - Click Update
- That’s it!
Future collaborators will automatically be on main; existing contributors may have a small amount of work to do to get set up, namely:
- First:
git fetch - Then:
git checkout -b main origin/main - Optionally (to tidy up their local git):
git remote update origin — prune - In some cases it may also be necessary to run:
git remote set-head origin main
Finally, only after you’ve migrated any dependent systems, your team has moved over locally, and you’re sure you’re ready to tidy up, delete the old master branch with: git push -d origin master
For more information check out the GitHub's documentation: Setting the default branch

